Creating a PebblePad ePortfolio
Getting Started with PebblePad

PebblePad
While you can use different media to create an eportfolio, at KPU PebblePad is an excellent platform you can use. Once you graduate, you can take your portfolio with you as an alumni.
PebblePad is a portfolio and personal learning platform. It is designed to help you, develop, design, and share your unique skills and attributes.
PebblePad can be used for your professional, learning, personal, showcase or capstone portfolio.
PebblePad comes with a range of tools to help you document your learning with intuitive digital tools.
If you would like to watch the short introductory video to PebblePad, click here. Or continue reading the reading the guide below for the 3 easy steps to creating your first portfolio.
Creating your PebblePad Portfolio
This guide covers how to create a portfolio in PebblePad.
1. Navigate to PebblePad
- https://app.pebblepad.ca/login/kpu
Log in with your KPU student credentials
(You can also access PebblePad through one.kpu.ca ) This will take you to your home screen in PebblePad.
You can always navigate back here by pressing the Pebble+ green icon to see what you’ve been working on.

PebblePad Terminology:

2. Create your portfolio:
- Click the burger menu > Get Creative > Portfolio

You’ve just opened your new portfolio!

Now it’s important to give your portfolio a name and save it so it becomes an asset in your store. You can go back and add to it at any time.
There is no auto-save in PebblePad so you must save your work often!
Next, add content to your portfolio.
Adding Content to Your Portfolio
Your portfolio is like a binder that you fill with content.
You can add tabs for different types of pages and on those pages you can choose what kind of content you’d like to add.
Get create and make it your own by adding some of your own artistic style.
Types of Content You Can Add to Your Portfolio:
Adding content to your portfolio is as simple as selecting the type of content needed from the “Add Content” menu.
To learn more about what each type of content and its features, click on the content type below.

Your page will always start with a stock PebblePad banner image, but this can be changed.
On the banner itself in the bottom right, you can choose from ‘Replace image’, ‘Remove image’, or ‘Resize image’.

You can change the properties of the banner by:
- Clicking anywhere on the banner
- Clicking in the ‘properties’ menu on the right-hand side < Properties
- You will then have some additional options:
- Background colour (only useful if you do not want an image)
- Banner height (choose a size that aligns with your design. Choose ‘auto’ for self-created banners
- Layout: Contains 3 options:
- Text on top of the image
- Text below the image
- No text
- Separating line
- Subtitle – tick box to either add or remove a subtitle
- Duplicate block – This will copy to block and paste it.

To add a new Banner Image, add one via + Add Content button.
Replace Image
Click on ‘Replace image’ from the banner as seen in Figure 3. This let’s you replace the image by either selecting:
- From a list Pebblepad images
- From images you have previously uploaded to Pebblepad
- Uploading a new image
Resize Image
- Click on ‘Resize image’ from the banner.
- Use the box to resize the image and select part of the image you wish to include.
- You can also change the size, centre alignment, and opt to save the edited image in your Asset store for use in other pages.

Adding Text to your page
- To add text to your page, select ‘Add Content’ and choose ‘text’.

- Enter text into the box or cut and paste text from another source (recommend pasting as plain text)
- You can format the text from the Rich Content Editor toolbar which will appear just below the ‘Add content’ button once you click into the text box.

- Other options for the text box can be found by clicking ‘Properties’ at the top right of the page next to “I want to…”.
This will open a list of options for this text box, including giving it a background colour.


Adding an image to your page
- Using the ‘Add Content’ button, select ‘image’. A block for the item will appear on your page.

- Next you will see a prompt to ‘Open Asset Store’ where you can access images you have previously uploaded or upload something new from your computer.

- To access options for your image, select the image block by clicking on the image (make sure it has a thin blue line next to it), and choose ‘Properties’ from the top right-hand sidebar.


- Add a title
- Add a caption
- Hyperlink to:
- Open image in new tab
- Link to website
- Open asset (from your PebblePad store) in new tab
- Open asset in current tab
- Do nothing
If you want to have the image and text side-by-side in, that’s also possible. PebblePad limits this to one image and one text per section.
You can do this by clicking and holding the image (or any content block), until it turns translucent and you can move it around. Drag it to the right edge of the text block until the edge turns blue, and then release it. You can then resize the image by dragging the bottom corner, until you get the desired proportions. If you wanted to rearrange the order of content, you would follow a similar process, dragging it above or below another block until a blue line appeared.
To remove a block of content, you can click on the ‘X‘ in the top right corner of the block.
You have two options for adding videos to your portfolio:
1) To display a video from the internet, use the embed content.

Go to the YouTube video, and find the embed code by clicking on the share code. Copy the code from that page and paste it into the embed block in your Portfolio. The video player should now show up in your portfolio.

Your video will now display in your portfolio.

2) You can also display a video you have recorded (for example on your computer) and by adding it as a resource in PebblePad.

Once you select video, PebblePad will ask you to choose a video or upload one from your computer. Select the file and you can now display it in your portfolio.

Quotes are a great way to add some style to your portfolio. They add a large block of text you can edit to a block in your portfolio.
To do so, click “Add content” and choose “Quote” for the type. Paste in the quote.
You can set the background colour and adjust the width using the properties panel.

To remove a block of content, you can click on the ‘X‘ in the top right corner of the block.
This is permanent, so be sure you’d like to do this.
Return to your Asset store and select your portfolio via the asset icon.
1. Click I want to > Share > With the web. Set your permissions and Share.
2. Copy the URL to your clipboard if you wish, and close the share panel.
3. Paste the URL into a browser tab to view.
4. You can share this link publicly.
For class: your instructor will let you know how they would like it shared. Options could be:
– With this link by email, Moodle assignment, etc.
– To an Atlas workspace
You can embed other media to your PebblePad ePortfolio.
- Using the ‘Add Content’ button, select ‘embed’. A block for the item will appear on your page

- Paste your embed code (from your source resource) into this box
- Click OK.
- Your resource should now appear Click here for a list of supported resources you can embed

Organizing your Portfolio:
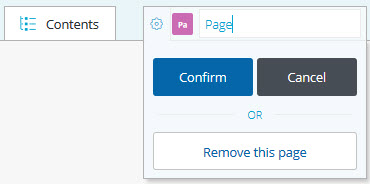
To give a page a title or to edit the existing title, click on the blue cog icon to the left of the page tab. This makes the title text editable.
Edit the title and click Confirm to save the change.
You can also delete the page by clicking on Remove this page. This will delete the page.
To add a new portfolio page, click on the + tab to the right of the page where you’d like to add your new page.
This will give you three options for a new page:
Add a new page here – This option adds a blank new page.
Add an existing asset – This option opens the Asset Store so you can choose from any of your Assets created in PebblePad to use as a page (for example a page from another portfolio or workbook). Note: you cannot use uploaded Assets, such as documents or presentations, as a page in a Portfolio. These can be added as links.
Add an existing portfolio – This option opens the Asset Store to select an existing portfolio to add as a nested portfolio in this tab.

If you want to change the order of blocks, you can drag content blocks on the page, or select the block and use the small arrows on the left side of the page to move it up or down.
Something to also take note of is that new content blocks added by clicking “Add content” will always appear below the currently selected content block, or at the bottom of the page if no blocks are selected.
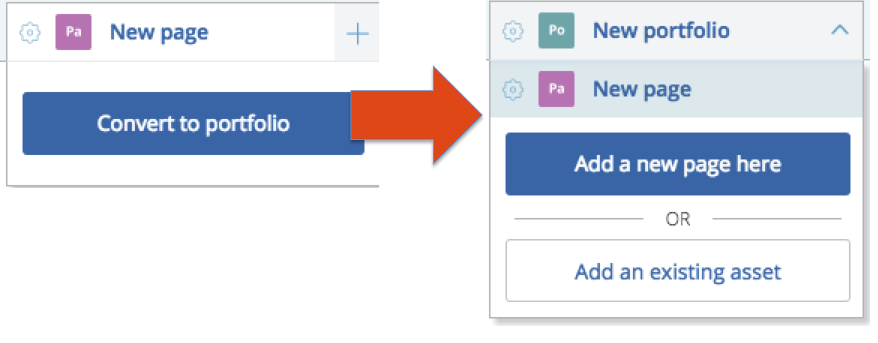
If you would like to convert one of your tab pages in to a portfolio, click on the page and you will be presented with the option to “Convert to portfolio”.
This allows you to convert the existing page to the first page of a nested portfolio of pages within that tab. Thing of it as a portfolio within a larger portfolio. These are great for organizing a group or work you’d like to present on a page.
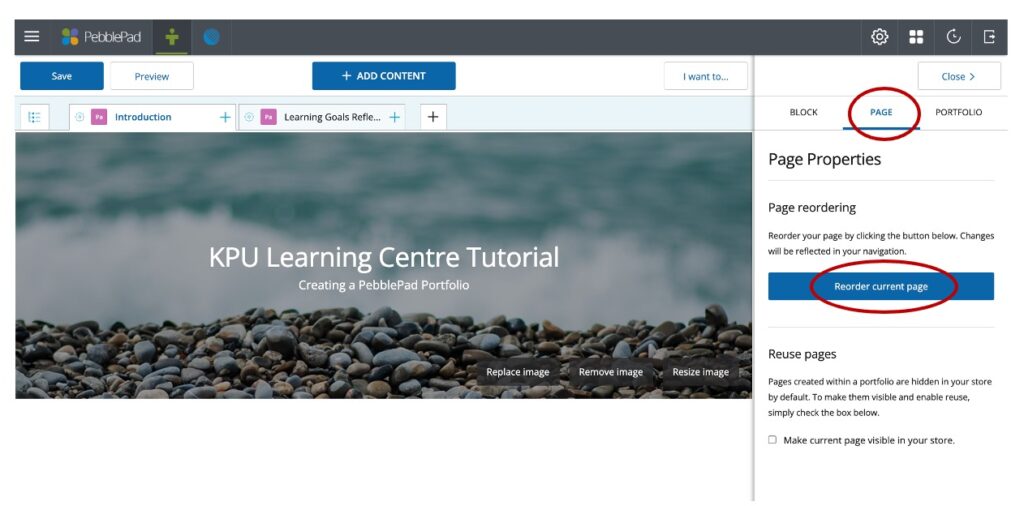
If you want to rearrange the order of pages in your portfolio, open Properties, select “Page” at the top of the properties panel.
You can now click “Reorder current page” to move the page you have open to before or after a different page in your portfolio.
To reuse a page that has been built within a portfolio, follow these steps to make it available as a separate asset in your store:
1. Click on the tab of the portfolio page you would like to save as a separate asset (in this scenario it would be your About Me page).
2. Click on Properties and ensure you are on the Page tab.
3. Under Reuse pages, tick the option to Make current page visible in your store.
Go to your new portfolio, create a new page, and select “from asset”. You can now reuse your previous page.

Why would you tag a file?
Tagging is a fantastic feature you can use to organize your assets. By tagging the files you upload, you can easily locate them later and filter to find groups of related files.
To create a tag:
- Go to the asset you want to tag
- Open properties from the sidebar
- Under INFO add your tag
– If you’ve created a tag before, it will auto suggest that tag when you start typing. Select that tag.
– If it’s a new tag, click the Add button which will create a new tag.

Tip: If you are uploading multiple files at the same time you can’t change the individual titles for each file at this stage, so tagging these images enables you to group them together and find them more easily.

Using PebblePocket
PebblePocket is an additional app you can use to easily add content from your phone straight to your asset store and use in your portfolio. Using PebblePocket is completely optional but it might come in handy.
To learn how to use PebblePocket, click the link and follow the easy steps.
Handouts:
Create your portfolio in PebblePad, step by step guide
Using PDFs in your PebblePad eportfolio
Introduction to Using PebblePocket
Introduction Video:
Getting Started with PebblePad
References:
PebblePad Education Centre: Extensive list of resources to using PebblePad and Atlas.
2023 Pebble Learning Ltd. Licensed under CC BY-NC 3.0. Powered by PebblePad
Pebble Pad – KPU Teaching and Learning
With thanks to Gillian Sudlow and Lisa Gedak
University of Waterloo IST Knowledge Base -Created by Barb Yantha. Accessed March 2023.
UTAS PebblePocket Guide Accessed March 2023
University of Melbourne Edit your portfolio. Accessed March 2023
Last updated: May 2023